Tuesday, May 31, 2011

Blogiversary, Cake Recap and a GIVEAWAY!

UPDATE:WINNER OF BLOGIVERSARY GIVEAWAY
Comment number two! Kim Cook you are the winner of the 12 piece cupcake decorating set and the "What's New Cupcake" book.


Kim said "One of my favorite childhood memories is playing in the sprinklers during the summer time. Can't wait for Savannah to be big enough for that!"

Congratulations Kim! I have your email and will send you an email.
---------------------------------------------------------------------------------------------------------------

WOW! I can't believe it has been a year since I have been blogging. I am glad that I got on the blogging wagon as it has been lots of fun and meeting new people along with other bloggers. Thanks to all of my followers and supporters - you mean so much to me!

Looking back at all the yummy treats I added makes me so hungry for sweets. Remember  this party I did for my nephew with this cute Cars themed cake. 


And this cake for Constance's (my daughter) Dora Fiesta


And here are just some others from the past year!


 This clown cake was one of my first cakes I did during a cake decorating class!!

WELL ON TO THE GIVEAWAY!!!!

One Lucky reader will win a brand new Wilton 12-piece cupcake decorating set along with a brand new What's new cupcake book by Alan Richardson and Karen Tack!
This cupcake decorating set is perfect for those wanting to learn to decorate cupcakes. You will get 4 decorating tips, 8 disposable decorating bags and decorating instructions! The What's New Cupcake book is LOADED with easy and fun cupcake ideas to create a one of a kind cupcake! LOVE this book!


Here is how to enter:
Leave a comment below telling me what your favorite childhood memory is!
- also a way for me to get in contact with you (email address)
-open for the US only (sorry!)

A few other ways to enter:
Become a fan of Sweet Memories on facebook and comment saying that you did or that you are already a fan!

 Suggest my facebook page to your friends and tell them to leave a post on my wall saying that you sent them!

Follow my blog and invite your friends to follow me!

Giveaway will end Sunday, June 5th at Noon! Winner will be announced on Monday, June 6th! 

Good Luck!!


Monday, May 23, 2011

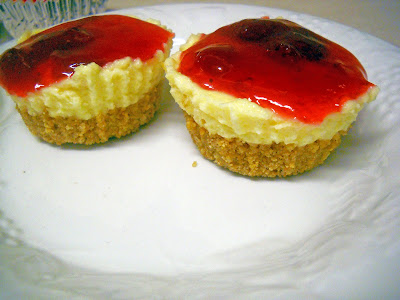
{Jell-O} No Bake Mini Strawberry Cheesecakes

 
 So every now and then I will crave sweets late at night and this was one of those nights when I didn't feel like cranking up the oven and using my mixer for something tasty. I really had never had cheesecake before, but opted to try out this version because it looked really good. These cheescakes definitely did not take long at all to mix and assemble.


 And to my amazement they were quite the tasty little treat. I am sure there is a difference in taste when it comes to the original strawberry cheesecake, but I really liked these. They sure did not last long between my husband, Constance and myself constantly going back in the fridge to grab one.
 I think they are so much cuter and much more personal in cupcake liners. Just like a cupcake, you don't have to share at all. (I really liked the graham cracker crust.)


So I am really going to have to try making my own cheesecake from scratch.

To make these into cupcakes: Follow the directions on the box to prepare the mixtures. Line your cupcake pan with cupcake liners. Evenly distribute graham cracker filling into each liner. Then press down to flatten out the grahams with the back of a spoon. Next, evenly distribute the filling into each liner on top of the grahams. and spread out. After all that, its time to pour the filling on top. Cut a slit in the topping pouch and pour evenly over all the cheesecakes!

Hope you have a Sweet Monday!!

Tuesday, May 17, 2011

{New Designs} Graduation Celebration Invites and Party Tags


Hey guys! I have had some free time to create some new designs and I knew graduation was around the corner for the 2011 year. I know some colleges have already have their graduations, but there is still time to celebrate. And a college graduation needs a HUGE celebration! 

These designs are a little more on the modern side and I am excited to be able launch them off right here and would love to bring you more modern and contemporary designs in the future. Each invite has matching party tags (great for cupcake toppers and so much more). So below you will find one of either design in the different color options. These are totally customizable and can be done to match your school colors.


All the designs are now available in my etsy shop! Shop HERE

Wednesday, May 11, 2011

Thick and Chewy Chocolate - Chocolate Chip Cookies


Yesterday was indeed National Chocolate Chip Day and I had to bake something! I had these limited edition mini morsels in my cabinet in the colors pink and yellow had been wanting to use them. I picked them up from target around the end of April (in case you are wondering where I found them). 


I immediately thought of some yummy thick and chewy chocolate chip cookies. I have tried this recipe before here and it came out pretty good. I decided to try it again and see if they could be a little thicker and a little more chewy - with out having to microwave them to make softer and gooey. So I followed the same recipe only not splitting the dough in half to make 2 different flavors. And I added about 3 1/2 tbsp of Hershey's Dark Chocolate Cocoa Powder. 

As you are working with the dough, warm hands cause the dough to get loose and melt some. So I used a metal pan for my final mixing pan and put it in the freezer for a few to keep it cold and from melting. This works a lot better when trying to get them thick and chewy. I went to place them on the pan, I followed the directions for rolling into a ball, then I came back around and made them tall balls. Then threw the whole pan in the freezer to make them stiffer.

 You let them bake at 325 degrees (I did 300 because of my darker pans) for 11 - 14 minutes. I recommend 12 1/2 minutes. When they come out of the oven, they look so delicious. I could tell these were going to be better than when I made them the first time. It will be really hard not to eat an entire pan that is still fresh and warm :-)


 They came out perfect. After cooling completely the chocolate chips are still soft and gooey and the whole cookie is thick and chewy! Love it!!


Here is the recipe:

Thick And Chewy Chocolate Chip Cookies

Ingredients
2 cups plus 2 tbsp. all-purpose flour
½ tsp. baking soda
½ tsp. salt
12 tbsp. unsalted butter, melted and cooled until warm
1 cup brown sugar, packed
½ cup granulated sugar
1 large egg plus 1 egg yolk
2 tsp. vanilla extract
1 ½ cups semi-sweet chocolate chips

Directions
Adjust oven racks to upper and lower-middle positions.  Preheat oven 325°.  Line two cookie sheets with parchment paper.

Whisk dry ingredients together in a medium bowl; set aside.  With electric mixer, or by hand, mix butter and sugars until thoroughly combined.  Beat in egg, yolk, and vanilla until combined.  Add dry ingredients and beat at low-speed just until combined.  Stir in chocolate chips.

Roll a scant half-cup of dough into a ball.  Holding dough ball in fingertips of both hands, pull apart into two equal halves.  Rotate halves 90 degrees and, with jagged surfaces facing up, place formed dough onto cookie sheet, leaving ample room between each ball. As you are working with the dough, warm hands cause the dough to get loose and melt some. So I used a metal pan for my final mixing pan and put it in the freezer for a few to keep it cold and from melting. This works a lot better when trying to get them thick and chewy. I went to place them on the pan, I followed the directions for rolling into a ball, then I came back around and made them tall balls. Then threw the whole pan in the freezer to make them stiffer.  Bake, reversing position of cookie sheets halfway through baking, until cookies are light golden brown and outer edges start to harden yet centers are still soft and puffy (approximately 11-14 minutes).  Do not over bake.

Cool cookies on sheets until able to lift without breaking.  Transfer to a wire rack to cool.
What I did differently, in RED

Sources: Found on Annie's Eats and adapted from Baking Blonde, original from Baking Illustrated


Monday, May 2, 2011

{Royal Wedding} The Cake

Oh my goodness, did you watch the wedding on Friday?! I was literally GLUED to the TV and enjoyed every moment of it. William and Kate are such a beautiful couple. Its so funny that her real name is Catherine with a "C" and she spells Kate with a "K" of course. I thought I was the only one that did that. ( Crystal and spell my nickname with a K - Krissy)

Anywho, there were two main parts that I was DYING to see! That would be the CAKE and her wedding Dress of course! That cake was absolutely magnificent - all the details that went into it. I know that took a good eye and patience to create! Being a caker myself, I can appreciate that beautiful, intricate design. I love how there was 4 sets of tiered cakes on the bottom first 3 tiers. One of those tiered sets would have been my wedding cake. So if you add all those up there would be a total of 21 tiers!!! Wow!

I would have flipped out to be designing a cake for a Prince and Princess, knowing that the Queen would be at the event also. I have to give it to these talented ladies for really holding it together and creating a masterpiece!

For Kate's dress, it was gorgeous!!! Not too long of a train, very form fitting at the top and just extremely ELEGANT! She was amazing. The whole car ride to the ceremony, she just seemed so relaxed and calm. She is such a natural Princess! Congratulations to the newest Royal Couple!

I am still OBSESSED with this wedding and would love to watch it over and over again.

Hope you have a fabulous day!

LinkWithin

Related Posts with Thumbnails